Marble Ski Jumping: the idea
The idea for this STEM activity came during the midst of our unit on motion physics. Maybe it was one of the multitude of examples covered to explain concepts. (I don’t recall.) However it came about, I decided we would apply our studies on a smaller scale with Marble Ski Jumping.
As is usual for my lab activities, it needed to be simple, inexpensive, doable, and, naturally, engaging. Of course, it had to align with our standards.
STEM Activities in Science
Using STEM activities in the science classroom offers many advantages for students’ learning and development. Here are a few of its advantages:
- hands-on experiences enhance student understanding and retention
- these activities stimulate critical thinking and problem-solving
- group work supports teamwork and collaboration
- their open-ended nature allows students to creatively problem-solve solutions
- they boost inquiry-based learning
- they introduce students to skills used in science, technology, engineering, and math
Motion Physics: Speed, Velocity, and Acceleration
Introduced in physical science and fleshed out in physics, the study of speed, velocity, and acceleration, motion physics, is the perfect avenue for a STEM activity.
One of my favorite physics units is the unit on motion.
Why? Students can relate to it.
The associations a teacher can make to help students with real-world situations are truly astounding. Soccer, tennis, bowling, dance, baseball, skateboarding, snowboarding, and more, are all grounded in motion physics. Even if a student doesn’t play a sport, they can still relate to some activity.
The Significance of Hands-On Learning in STEM Education
Don’t get me wrong, science experiments are wonderful. Their drawback becomes evident with canned experiments. Yes, they have their place and I occasionally use them. However, the freedom found in providing classes with minimal guidelines (we’re talking STEM and GOOD lab experiments ) opens students up to engagement and deeper understanding. Not to mention team collaboration and the mingling of science and engineering principles and practice.
Promoting critical thinking and problem-solving skills
I love it when you give students guidelines (minimal guidelines) and they form working groups. Typically, one or more groups will come up and ask “What should we do first?”.
My typical response is, “You know what the problem is. So, talk about it as a group and decide how best to approach it.” At that point, I become silent or move about the classroom glancing at what others are doing. How else am I going to force them to collaborate and think?
After the initial deer in the headlights look, they figure something out. Sure, they may “see” what others are doing. It may take a bit. But, once they get into it, they flow.
Overview of the “Ski Jumping” Ramp Activity
Setting the Stage
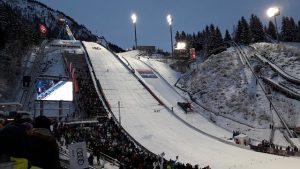
At the start, before they even begin, I make sure they understand what a ski jumping ramp is. This is accomplished with a video clip and maybe a picture or two.
[Divulging, at the start, that they will be using this motion physics activity as a real-life example was a calculated maneuver.]
Then I tell them they will be building a “Ski” jumping ramp. The difference? … a marble will be doing the jumping. The primary objective (for them) is to construct the ramp using the materials I give them to propel a marble the farthest from the end of the ramp.
Yes, it’s a competition! That helps liven things up even more.
The Objectives
For this STEM motion-related activity, students have two key objectives:
- as mentioned above, the marble was to travel the farthest from the end of the ramp
- unbeknownst to them, at this time, they were also going to implement the motion physics learned in class to calculate the marble’s speed, velocity, and acceleration
Constraints and Guidelines
As is common with any STEM activity, a set of limiting factors was set in place. Students knew that the ramp platform was to be made of a strip of poster board. (28″ long and about 1-1.5″ wide)
Cardboard is provided in whatever amounts they need. However, the height of the ramp and the base dimensions were limited.
Masking tape was also provided as needed. I keep a keen eye on how much is being used. You know how students are with tape, right?
Oh yes, a time limit for completion (several class periods) is set too.
Trails and Limitations
On competition day, students are allowed two trials. The better jump length becomes their standing in the competition. Before the competition and while constructing the ramps, they are allowed as many trial runs as needed.
Preparations and Planning
As mentioned above, students can run as many test trials as they wish. They are, however, limited to two trials in the final “competition”.
Some groups begin building right away… meaning they plan as they build. Others make a plan and do a little research before beginning construction.
Students are allowed to reject a ramp design and start anew. However, they have to destroy all materials to receive new ramp material. Nothing like the push of time to make a group hunker down to get it done.
As is common, students experimented with different ramp platform shapes each time this activity is implemented. Some choose to set the height of the ramp as high as allowed and then tweak the end. (A good strategy for developing momentum.) However, a poorly designed end can cancel the maximum height beginning.
Other groups play with the shape of the ramp platform until they find a workable curve. Then they set about building a platform to support it.
Regardless of how a group tackles the problem, their ingenuity is lauded by me.
Implementation and Execution
The day of the competition has arrived. Student groups eagerly await their turn to test their design.
To make sure that the competition is measurable and fair, a sand pit is constructed. It consists of a dissected black trashcan liner on which play sand is poured. The idea came from the long jump in track. The contest measurement is made from the end of the ramp to the back end of the marble impression.
I officiate the measurement and call out the values to a volunteer who writes them down. The best measure of the two trials is their score. Any attempts to “push” the marble down the ramp forfeit a turn.
When I first began this activity, it was just a matter of who had the longest jump. As years passed, the competition was changed to an elimination challenge. This helped with group errors during the trials.
Before the competition begins, students are told that the activity isn’t just about the longest jump distance. They learn that afterward, they will have to determine the speed, velocity, and acceleration of the marble.
So, after the contest is concluded and the winners are congratulated… or booed. We go back to the class to discuss the finer points (applications) of how to calculate the three types of motion.
Now, each group in turn would measure the distance and time of the marble travel. The distance was easy as we measured the motion only along the length of the ramp surface. Stopwatches provided the time.
With these two measures, speed and acceleration were calculated. A compass gave us the necessary factor for determining the directional component of velocity.
Analysis of Results and Learning Outcomes
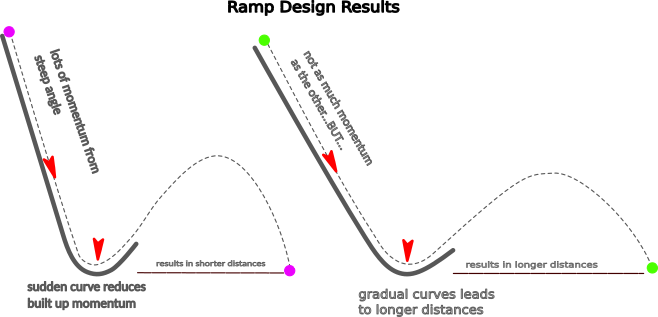
Most students saw the connection between the ramp designs for actual ski jumps and their own. Many chose a design that looked like this [see below] as a winning design. But, through trials, they soon learned that though the height helped with marble momentum, the sudden upward curve not only cut down on the marble’s distance but reduced the marble’s momentum.
Some chose a flatter design [see below] which did well for propelling the marble forward but lacked momentum to achieve their desired end.
When all was said and done, a discussion of the designs led students’ to engage their “engineering brains”.
Calculating the facets of motion was simple. Since speed = distance/time, they measured the time it took their marbles to travel the length of the ramp. And, with a compass in hand, adding direction to the equation produced velocity.
Acceleration was a bit trickier. Acceleration = vf – vi/t (cm/s/s). They knew that vi was 0. Vf was the speed calculated previously. So, it was just a matter of dividing the speed value by the same time used to calculate speed.
Since acceleration can be a tad tricky, the time we spent before the Marble Competition going over examples, explaining scenarios, and completing worksheets helped tremendously.
All-in-all, I would have to say that this motion physics lab experience is a definite keeper. The students enjoy the free thinking, engagement is high, and they love the chance to open up new avenues in their gray matter.
Conclusion
Through this post, I have endeavored to share an innovative approach to teaching motion physics through an engaging activity called ‘Marble Ski Jumping’.
The desire originated to create a lively and convenient learning experience that provides a hands-on application of our learning objectives. The processes I use for designing, implementing, and analyzing the Marble Ski Jumping activity are explained. From blending science objectives and limitations to fostering critical thinking and problem-solving skills, my aim is to highlight the educational benefits of hands-on STEM activities.
Through the Marble Ski Jumping competition, students can apply motion concepts as they relate to calculating speed, velocity, and acceleration. Embracing the idea of experiential learning, I stress the importance of STEM activities for fostering creativity, collaboration, and inquiry-based exploration in science education.
Related Links
Ski Jump – Science of the Winter Olympics
Grab Your 4 Keys to an Outstanding Lab Experience Guide…It’s Free!